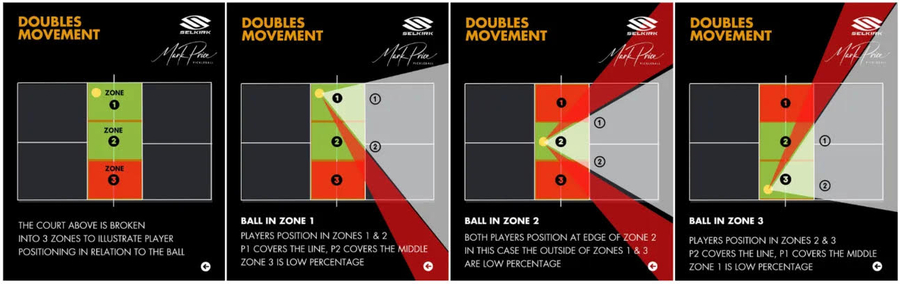
For those of us who are visual learners, here is a series of graphics to visualize optimal court coverage.
You’ve heard it a million times: “Partners should move like they’re connected with a string.” Well, here you can see why that is important.
When the ball is in zone one, you (player 1) are responsible for protecting your sideline. Your partner (player 2) slides over to protect the middle of the court.
When the ball is in zone two, you and your partner return to a more neutral position, evenly spaced to equally guard against attacks down the middle or dinks out wide.
When the ball is in zone three, you and your partner are in the opposite arrangement from zone one. Now, they’re in charge of the sideline and it’s up to you to protect the middle.
These visuals are great for seeing the perspective from both sides of the court.
The white cones are the viable angles for an attack.The red portions represent low-percentage attack zones or angles where a slower dink would need to be played.
The white portions are the parts of the court that need to be protected.
Use this code for a 10% discount on a custom paddle
First Time Buyers Only
Why we are different
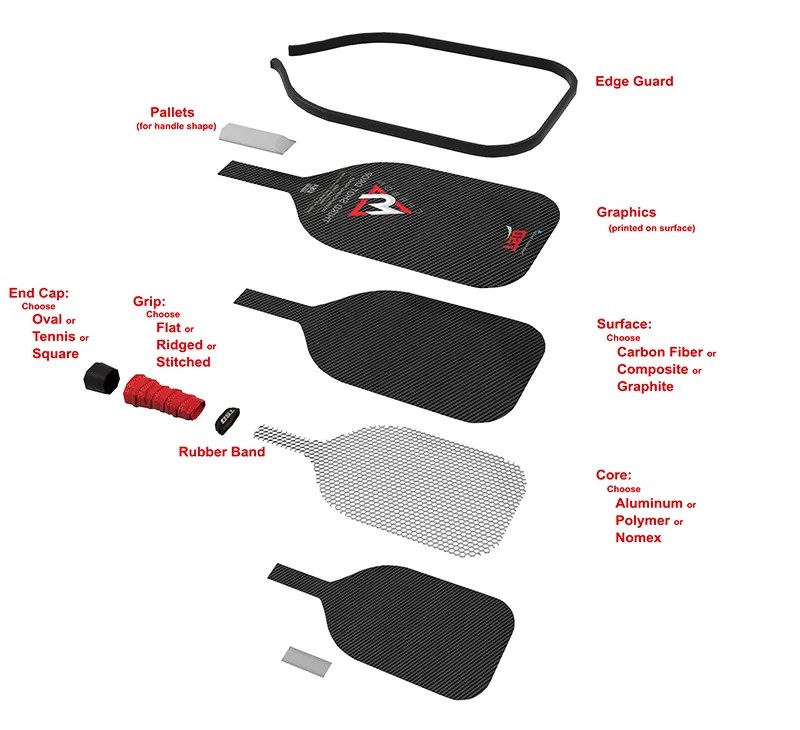
There are well over 100 paddle manufacturers serving the pickleball industry. We are the ONLY custom paddle manufacturer in the world. In order to understand what it is we do and why it’s unique, it’s necessary to understand how a paddle is made.
Every paddle with few exceptions has a honeycomb core. The different companies in the industry use one of three different materials for the core- aluminum, polymer and Nomex. We use all three. The core provides 75% of the way a paddle performs.
Then the honeycomb core is sandwiched between two thin layers of surface materials. Again, the different companies in the industry use three different materials- graphite, fiberglass composite and carbon fiber. We use all three. The surface material is about 25% of the way a paddle performs. Think of it as fine tuning the paddle’s performance characteristics.
The three different core materials combined with the three different surface materials make 9 different combinations of materials. Each plays differently. We make two (soon to be three) different shapes for our paddles. The Chaos has a large square sweet spot- at 8 1/2”, it is the widest paddle on the market. The Kratos has an equally large rectangular shaped sweet spot. Each combination of cores and surfaces is available in both the Chaos and Kratos shape.
Then we give each player the opportunity to select their paddle’s weight (ranging from 7.4-10.5 ounces).
Now comes the grip. Players can choose one of three different handle shapes, their grip size from 3 7/8” to 6”, one of three different grip materials and more than 10 colors for each grip style.
Now that the player has chosen the best paddle shape, core, surface and grip for their individual game comes the fun part. We can put any custom graphic the player chooses on their paddle face- either one of our many choices or one of their own- a picture, logo or graphic of their choosing.
Now every player can play with a totally bespoke paddle and watch their game immediately improve because they are playing with the right paddle for them in every way.
Every other sport has specialized equipment for every player except pickleball. Not anymore- now pickleball is catching up to other sports. Pickleball players spend a lot of time playing the game they love. Now they can play with the gear that suits them and not be forced to use a one size fits all paddle.
Want to Join Team TSD?
We are actively seeking avid pickleballers with sales experience to educate, demonstrate and promote Third
Shot Drop pickleball paddles.
Please send your prior sales experience, where you play, how often you play, what level player you are, if you
play Tournaments, how many players you can reach and your contact information to:
Ashley@ThirdShotDrop.com